Understand data binding using plain JavaScript and everyday examples.
Prerequisite: This article assumes you have some knowledge about html and JavaScript.
According to Microsoft docs, data binding is the process that establishes a connection between the app UI and the data it displays. If the binding has the correct settings, and the data provides the proper notifications, when the data changes its value, the elements that are bound to the data reflect the changes automatically.
Let’s explore this statement in much simpler terms using everyday situations.
Imagine a water tank connected to both the main water supply and your house. The flow of water is obviously from main to tank and from tank to house. When you open the taps, you are able to access and consume water as and when needed if it is available. In this flow, the tank acts as a reserved and known location where water from the mains is stored to later be accessed by the consumers.
In this simple analogy, we have the source (mains), the data (water), a variable (tank) to store the data into, and the UI (house/taps) to use the data.
The house as a consumer of water knows where to find the water and the mains as a source knows where to send the water in order for the house to access it. There is a single know point that connects or binds the mains to the house.
This is the general concept of data-binding, a reserved named location (variable) where the source of data saves it and the consumer of data, accesses it. The two ends, source and consumer are therefore bound together by this location.
If there is no water in the tank then this change in situation is automatically reflected in all the taps of the house that are connected to the tank and rely on its supply and the reverse is also true.
One-way data binding Vs Two-way data binding.
In our water-tank analogy, water flows to the tank and only then can it be used by the house. There is never a scenario where water flows from the house and into the tank, to either be reused by the house at a later period or returned to the mains.
This is the idea of one-way data binding. The UI element consuming data from this named location in memory (variable) can not send back data to this variable. It only consumes data saved into it from perhaps a database.
Two-way data-binding works a little differently, I will employ another analogy to try and give a non-tech background to this concept.
Imagine you want to find out how much you weigh, you find yourself a weighing scale to assist with this task. You then stand on the foot pads, moving the scale pointer to reflect your weight.
When you think about our little experiment, the source and consumer of information are the same. By standing on the weighing scale, you become the source of data and when the pointer moves to reflect your weight, you become the consumer of this information.
The most important aspect in this flow of data, which distinguishes one-way binding from two-way binding, is that the UI element consuming saved data can under certain conditions become a source of information for example through user input.
We will explore this further using code examples, however, before we proceed, why should you care about data binding?
What are the advantages of data binding?
- Makes debugging easy. Having a single point of connection between the source and consumer of data means that the entire process can be separated into two parts. Recall our water tank analogy, if there is water in the tank but not in the house then the issue is somewhere between the tank and the house, while if there is no water in the tank, then the issue is somewhere between the tank and the mains.
- Makes collaboration between developers easy. Data binding creates a predictable information flow structure and any other developer looking at your code doesn’t have to first understand it all before working with the files.
- Reduces the risk of malfunctioning code. The more you move and store the same data in different variables in your files, the greater the likelihood of introducing bugs to your code.
- Data binding helps us create dynamic and reusable templates because data isn’t hard coded into the UI files. In our example we use one html file to display different user names.
Practical demonstration
Sometimes easy concepts are complicated because they are explained within others hence why I chose to approach this with basic javascript and html.
Using technologies you are already familiar with will enable you to relate and have a better understanding. What you will realise is that you have used this concept before and are simply attaching a name to it.
Disclaimer: For easy learning, I have overly simplified the reactivity system built into frameworks that support data binding. Please don’t try to use the code examples in here beyond this article.
Step 1: Create files.
Create the following files; index.html, one-way-binding.js and index.css. Link the css file to the html file in the head element tag. Inside the body tag, add a script tag with its src as the js file.
Add an empty div tag with id display. Your html file should look like the image below at this point. For an exact match, ensure that all 3 files are in the same directory otherwise, the linking will have to be modified to suit your file locations.

Open your css file and paste the code below. This is not an integral part of the demonstration, and as such you might ignore any css related code but I wanted to simply increase the size of the text and center it to ease visibility.
#display {
 font-size: 40px;
 font-weight: bold;
 text-align: center;
 margin-top: 100px;
}#user-input {
 display: block;
 width: 200px;
 margin-left: auto;
 margin-right: auto;
 margin-top:80px;
}
Step 2: One-way data binding.
Recall from our analogy the tank is binding or connecting the mains to the house.
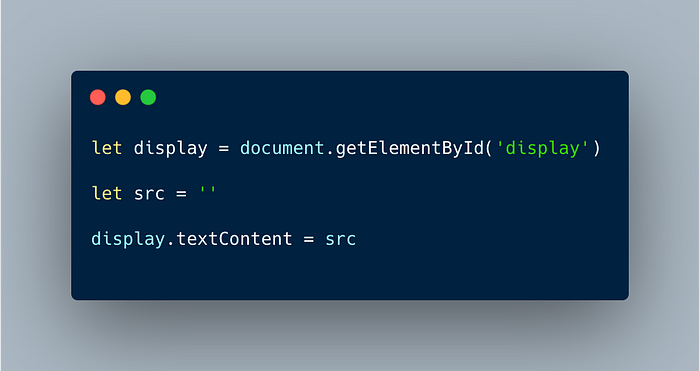
Let us recreate this with code. Our house is the div element in our html file. It consumes a resource from storage. So the first thing we are going to do is access our div tag using the getElementById method, sounds familiar?
let display = document.getElementById(‘display’)
Now let’s create our tank, a known location into which we can store water (resource) and pass it to the house upon request. We are going to declare a variable called src and initialize it to an empty string.
let src = ‘’
So right now we have a tank, we have a house but they are not connected. Let us connect/bind our tank to the house. We are going to access the textContent property on the html tag we accessed using getElementById and set it equal to the src variable.
display.textContent = src
Congratulations, you have achieved one-way data binding. Simple right? And am sure this is something you have done countless times before. So currently, when the value in the src variable changes, your div tag will show the new value as its content.
Your index.js file should look like the image below.

Let’s load our html file in the browser. The simplest way to do this is to double click your html file, and it should open up in your default browser.
I expect you to see nothing in your browser when this page loads. That is because we have an empty tank, our variable src was initialized to an empty string. So add any name of your choice, then refresh the page. It should display the current value passed into the variable.
We are now going to connect our tank to the main supply line. We will add some code to mimic the idea of a tank being resupplied by the main line. A value will be passed to the src variable which will automatically update the UI element it is bound to.
when the data changes its value, the elements that are bound to the data reflect the changes automatically.
Let’s declare a variable named database, and initialize it to an array with maybe 5 string values for example names of your friends. This array will act as our mains from which we will extract a value, save to our variable src (which is our tank) and then that value will be passed to the html tag (our house) to be used.
let database = [‘Jacob’, ‘Diana’, ‘Ronald’, ‘Faith’]
Declare a variable index and initialize it to zero. This will be used to keep track of our location in the array.
let index = 0
Next, we are going to create a function that supplies a new value to our src variable from the database. This is not the best attempt at simplifying the reactivity system built around data binding in frameworks that support it, but it drives the point home. Copy paste this into your js file.
function fetchData () {
  setTimeout (() => {
    src = database[index]
    display.textContent = src
    index++    if (index <= (database.length - 1)) {
      fetchData()
    }
  }, 3000)
}fetchData()
Your js file should look like this.

Hit the refresh button in your browser and every 3 seconds you will see a new name display. So each time a new value is passed to src, the UI element bound to it updates.
The unidirectional flow of data is what makes this one-way data binding.
Step 3: Two-way data binding.
In one-way data binding, our src variable was getting information only from the mains or the database. The UI would then read from this variable and display information to the user. However in two-way binding, the UI doesn’t just consume information from the src variable, it can sometimes update the data in the src variable from maybe user input. There is a bi-directional flow of data.
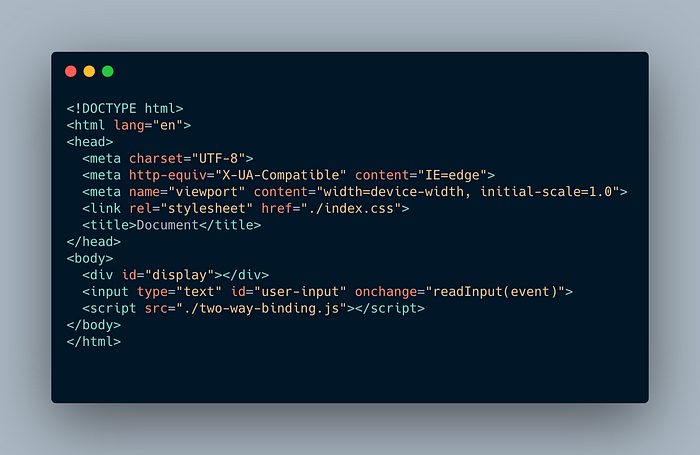
Let’s start by creating a new js file and naming it two-way-binding.js. Next we need to update our html file. Between the div and the script tag, insert an input tag with an id user-input, and an onchange attribute with the value as readInput(event).
<input type=”text” id=”user-input” onchange=”readInput(event)”>
Change the script src attribute to reference the new js file we have just created. Your html file should look like this

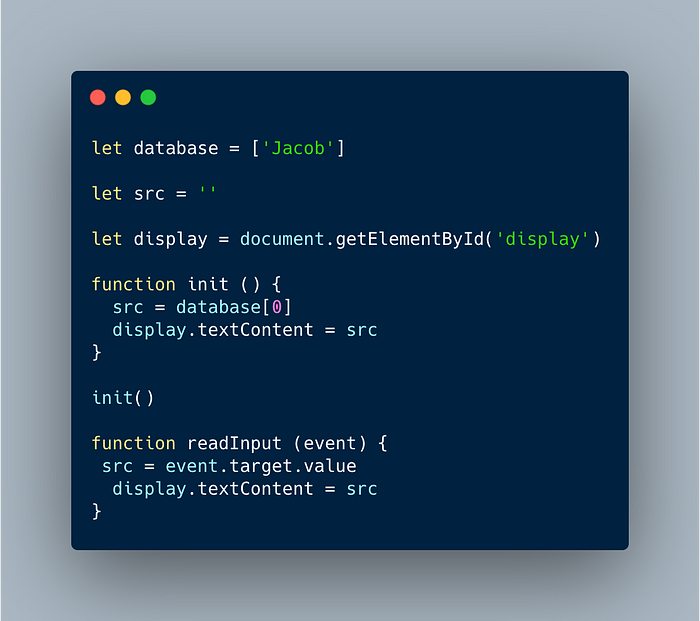
In our two-way-binding.js file, we will first demonstrate a scenario showing data coming from the database, saved into our src variable and displayed on the UI. This is similar to what we covered earlier with one-way binding.
Declare a variable named database and initialize it with an array of a single string value, a name perhaps.
let database = [‘Jacob’]
Declare a variable named src and initialize it to an empty string. This will be our connection point that binds the UI to the database. Data will be passed into it and read from it.
let src = ‘’
Access the UI element that we want to bind to the database through the src variable.
let display = document.getElementById(‘display’)
Create an initialization function. This function reads the first value in the array, sets it to the src and then binds the src to the UI element. Therefore in this case information is coming from the mains (database) to the UI element. Call the init function.
function init () {
  src = database[0]
  display.textContent = src
}init()

Load your html file in the browser. At this point, you should be able to see the string value that you placed in your array. The above process is equivalent to what we covered earlier in one-way binding.
Now to cover the other half of two-way binding, we are going to read data from the input tag and save it in the src variable. To achieve this, we are going to create a function named readInput. Copy and paste the code below.
function readInput (event) {
 src = event.target.value
 display.textContent = src
}
This function is reading the value passed into our input tag, and setting it as a new value to our src variable. The new value is then passed to our UI element to display.

Refresh your browser and type into the input area. Press enter when you are done and the input value should be displayed in the same location as your initial database value was displayed.
Congratulations, you have completed two-way binding. Information can either come from the database, as we noticed on initial load or it can come from the user. We are using a single connection point which is the src variable and when its value changes, all UI elements that are bound to it are updated.
Please note.
- To keep a predictable flow, if you want to save information to the database, you will have to read the current value of the
srcvariable which is the connection point. Data should never be directly read from an input tag. - Frameworks have a much better, efficient and reactive system which means you will write less code to achieve data binding and you won’t need to refresh the browser to see changes.
What I hoped to achieve.
Besides sharing my thoughts on data binding, by using plain js, I wanted to emphasize the idea that all concepts or frameworks you will encounter can be simplified into plain processes you can easily wrap your mind around and encourage you to try and isolate these concepts from the whole to best understand them and I promise you, this will help you avoid getting overwhelmed.
Please do follow me on medium for tech related content or you can connect with me on linkedIn using the following;
